DIY Journals for 2017!!

Happy new year!! I know that it’s not back to school time but I thought this would be a perfect journal/notebook for the new year. Let’s make 2017 great!!


Idea #1:

Materials:

  • Plain notebook/journal
  • Scrapbook paper (choose a light color that goes with your Sharpie. I chose a light color so the black sharpie would show up. If you choose a dark color then use silver Sharpie)
  • Sharpie marker (color that will show up on scrapbook paper^^)
  • Ruler
  • Pencil
  • Scissors
  • Glue stick/Mod Podge

Directions:

  1. Measure the dimensions of your notebook and remember the measurements.
  2.  Mark the measurements of the notebook onto your scrapbook paper, drawing lines to mark the spots an inch away from the actual measurement.
  3. Cut on the lines and place your scrapbook paper onto the notebook, folding around the edges.
  4. Apply a layer of glue or mod podge to the notebook and place the scrapbook paper onto it, smoothing down any air bubbles.
  5. Cut a slit on the point of the scrapbook paper and glue the edges onto the back of the notebook cover.
  6. Using letter stencils or freehand, write the subject name or whatever title you would like to give to your notebook on the top center.
  7. Around the title, draw a rectangle and decorate it with a mandala pattern as shown in the picture.
  8. Starting in the left bottom corner, draw a mandala design. Mandalas just require you to keep building upwards. Here is a video tutorial I watched for inspiration. You can use the picture of my finished notebook too!
  9. After the Sharpie design dries, apply a layer of Mod Podge to set in the design. This is OPTIONAL. (I didn’t do this)

Image result for scrapbook paper covered notebook

(not my picture)^^ but the notebooks should look similar, but with a  mandala design and label!!

Idea #2:

Materials:

  • Plain notebook
  • Gold spray paint
  • Painter’s tape/masking tape
  • Black Sharpie
  • Newspaper/cardboard

Directions:

  1. Cover a certain section of your notebook with masking tape, knowing that the part you do not cover is the part that will be gold.
  2. Take a piece of newspaper or cardboard and place it inside your notebook and covering the wires if you are using a wire notebook, so there is no way the paint can get on the pages.
  3. Simply spray paint the section of your notebook with no tape
  4. Write the subject/title of your notebook with the Sharpie

Creating a Garden

Here is what you can do to start growing a home garden. It is simple, and you just need to make sure you water it daily or water it depending on how long the water remains in the soil.

This is all you need:

~Soil

~Pot- you can choose one here. If you do not have the space to create a garden, then try a hanging pot, window box, wall pot, or a pot that is good for indoors.

~Seeds of your choice☺- you can look at many different seeds here

Another option: If you want your garden to grow fast, and want to guarantee that it will grow fully, then buy a small plant (such as basil), then transfer it to a bigger pot using soil. Make sure you water it! It will grow bigger then when you first got it!


Here are some photos from the garden in my backyard:) At the bottom there are recipes you can use basil and mint leaves for!!

photo 2

photo 4

Recipes:


Basil Leaves:

Basil Pesto– great with pasta!!

Strawberry Basil Lemonade

Strawberry Cupcakes with Basil Buttercream

Margherita Pizza


Mint Leaves:

Chocolate Cupcakes with Fresh Mint Frosting– such a great combination!

Mango-Mint Green Smoothie

Mint Chip Ice Cream Recipe


Iced Coffee Milkshake!!

Iced coffee is such a yummy drink that is prefect for the summer!! The problem I always have with iced coffee is that after making hot coffee, it takes a long time to cool down even with iced coffee. With this coffee milkshake, you can enjoy a creamy, thick iced coffee that tastes like a delicious milkshake in five minutes!! THIS MAKES ONE LARGE SERVING OR TWO SMALL ONES:);)


Iced Coffee Milkshake

https://justlivenlovenlaugh.wordpress.com/

Ingredients

  • 1/2 cup brewed coffee (with water)
  • 1/2 cup milk (any milk works; you can use less milk too but I use this much milk because I like the coffee flavor to be light)
  • 2 tbsp honey (add more or less depending on how sweet you like it!)
  • 1/4 tsp vanilla extract
  • 1/2 cup ice cubes (this creates foam on top of your milkshake that tastes like whipped cream!!)

Directions

  1. Combine all ingredients in a blender. Add more honey if you want it sweeter.
  2. Pour into a tall glass and enjoy!!


LEAVE A COMMENT WITH ANY QUESTIONS!!

Traveling: What to Bring for the Flight and Halt!

Traveling. It is something that is so fun to do, but takes a lot of planning, packing, and thinking in advance!! I am going to be going on a 20-hour flight tomorrow, and there are DEFINITELY some essentials that I want to bring. Especially with the halt in between. Click on the name of the object to see where I found it!!

Here they are:

IMG_1829.JPG

Charger– if your phone runs out of battery, or you forgot to charge it, find a plug on the plane and you can have full battery when you land:) Mine came with the phone, but you can find some cute ones at the link!

IMG_1832.JPG

Headphones– you can plug these into the TV or you can bring a device to listen to music while flying!

IMG_1825.JPG

Mints/Gum- I like to have these Ice Breakers that I found at Walmart. I also like to have gum for take off and landing- it really helps!!

IMG_1826

Snacks: Sunkist Trail Mix– this is a great thing to snack on while flying. It gives you energy and it is mostly healthy;)

IMG_1828

Snacks: Van’s Simply Delicious Gluten Free Say Cheese! Cracker – these are really yummy and they have whole grains in them☺ also, they are bite-sized and easy to pop in your mouth when traveling. any crackers like these are great!

IMG_1827.JPG

Snacks: LäraBar Chocolate Chip Cookie Dough Bars– These are SO healthy and good for you because they contain all natural ingredients and the simplest ingredients. they are also really yummy, but you have to find your taste. some of them you will like, but it may be different for others. I personally LOVE the apple pie flavor of these bars.

photo 1.JPG

Sanitizer– this is a must! There are so many germs on a plane since so many people have been on it. you should use this before you eat and other times you feel are necessary!


I also like to have books and sometimes I like to take a journal and pens to use as a “travel diary“!


The next few things are for the halt after a long flight (if you have one for where you are going. if not this is good to have before leaving the airport)-

photo 4.JPG

Hair ties– these are great to have on your wrist always- you never know when you’ll need one! photo 2.JPG

Hair brush/comb– this is to redo your hair once you get off the plane!

photo 5.JPG

Fragrance Mist and Deodorant- especially after a long flight, this keeps the smell away☺


…And of course, a good travel bag!


That’s it for me! Questions or Comments? Go to the top of the post and on the left hand corner under the date, click “leave a comment” and let me know what you think☺ Please know that I am on a trip for the next few weeks, but once I return I will be posting a lot!!!


Creamy Chocolate Popsicle for ONE!!

If you are ever craving a sweet frozen treat and want it soon, then this is a great post for you! And the best part- this is a recipe for one person. And it actually takes 2 minutes to make.  I made one of these today- and I forgot to take pictures of the “process”, but it is so simple that you don’t need any. More frozen sweet treats to come this summer☺ Let’s begin;)

The only ingredients you need are listed down below, but they are so interchangeable- you don’t need that specific amount and you can add your own things!!

creamy chocolate popiscle pic.jpg{excuse my one unpainted nail}


Creamy Chocolate Popsicle for ONE!!

https://justlivenlovenlaugh.wordpress.com/

Ingredients:

-1/4 cup+2 tablespoons vanilla yogurt (plain yogurt, Greek yogurt, vanilla Greek yogurt all work. I suggest vanilla/vanilla Greek because it gives it a nice flavor.)

-1 teaspoon cocoa powder (or more depending on how chocolate-y you want your popsicles. add less or more depending on your preference)

-2-3 tablespoons maple syrup (you can also use honey or agave syrup- I don’t like the taste it gives so I use maple syrup. You can also use sugar- not the same amount as maple syrup, just add it and taste it until you thing it is sweet enough.)

*****See important notes below!!

Directions:

  1. Put all ingredients into a blender or use a hand blender and blend until you have a smooth, creamy liquid that is a uniform color (should be a shade of brown since it is chocolate☺).
  2. Pour chocolate mixture into your desired popsicle mold. Depending on the size of your popsicle mold (mine is standard sized), it could make more than one. If you do not have popsicle mold it’s no big deal: Pour your mixture into a plastic cup then add a popsicle stick and pop it in the freezer! Buy one here!
  3. Freeze your popsicle for at least 4-5 hours or until it is frozen.
  4. Enjoy!!

I like to take my popsicle out for 10 minutes before I eat it so it’s easier to take out of the mold! This recipe is so yummy and great for a hot, summer day:)

*****Important Notes: You cannot use a spoon/mix it by hand because the cocoa powder will become clumps and it will not taste good. Also, make sure you use the thicker part of your yogurt and not too much of the liquid, because then the popsicles will have a sour taste. Using a little bit of that liquid is okay.


Let me know how it is if you try it in the comments below! Leave any questions there too!

How to Use a Coupler w/ decorating tips!!

This a short, but to the point post!! Here, I show you how to use a coupler. Couplers are meant to keep the frosting in, so that when you squeeze your piping bag, frosting does not come out of the sides of the bag. Let’s start!

Buy a standard sized coupler (for standard sized tips) here!!

Buy a large sized coupler (for large sized tips) here!!


What you will need…

  • Coupler (large or standard depending on size of tip)

  • Piping bag/freezer bag

  • Frosting tip

How to use a coupler!!

  1. Take your piping bag/freezer bag and place the tip inside.

  2. Draw a line at the middle of the tip (on the bag).

  3. Cut at the line, or more or less, so that the tip goes in the bag and half of the tip is sticking out. This way it has enough room to pipe but not too much space!!

  4. Take your coupler and unscrew the ring, so that both pieces are separate. photo 1

  5. Now take the larger piece of the coupler (not the ring that was unscrewed) and place it into your piping bag. Make sure it fits securely and is tight. To do this, push it down more.photo 2

  6. Place your frosting tip on the pointed part of the coupler like this:photo 4

  7. Take the ring and screw it over the tip and the bag MAKING SURE THE CUT END OF THE BAG IS SECURED UNDER THE RING. If it is not secured, then the frosting will be squeezed out when pressure is applied to the bag!photo 5

  8. You are now ready to pipe! This is how your bag should look like!:)photo 1

    If you want to change out the tip, simply unscrew the ring, take the tip off, put on your new tip and screw the ring back on making sure the cut end of the bag goes underneath!


Please leave a comment if you have any questions! Thanks☺

Decorationg Cupcakes…made EASY!!

When I first started baking, I watched SO many videos and tutorial on how to decorate cupcakes the way it was done in a bakery easily. Most of these videos were done by professionals with very hard-to-follow technique. This post breaks down how you can make beautiful, bakery worthy cupcakes like the ones below with a few easy tips and steps!!

cropped-vanillachococupcakes2.png


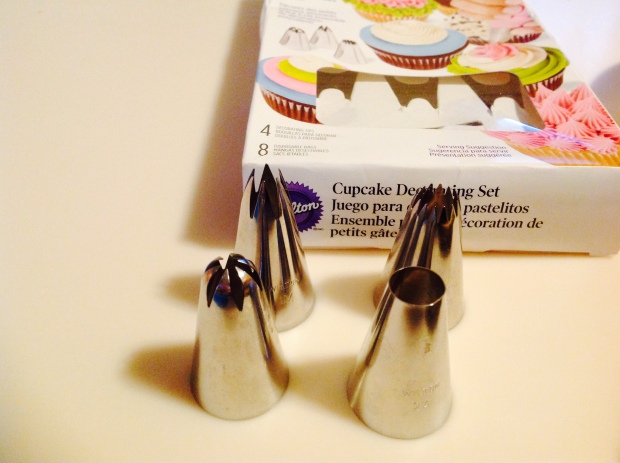
The first step: getting your supplies straight. What do you need to decorate cupcakes like a pro?? You’re about to find out☺ Different websites and videos name their favorites and what has worked for them when it comes to decorating cupcakes. This made it so confusing when I went to buy my own set of supplies! The brand I use for piping tips is Wilton. This has been a full proof brand for me and can really help you make amazing cupcakes!! This is the set I bought from Wilton (my first cupcake decorating supplies!). This set comes with four big tips, which are awesome for decorating cupcakes: the “star tip 1M, round tip 2A, drop flower tip 2D, star tip 4B”. It also comes with disposable piping bags which I prefer over the reusable ones- they’re much easier to clean! It also comes with an instruction booklet on how to use the tips.

I think that it is better to create your own “set” by buying different supplies that you can use. First, I will explain and tell you what products I think are great to start you off, and then, I will link them below so you can order them! THE PINK WORDS ARE ALL THE LINKS. CLICK ON THEM TO BE DIRECTED TO THE WEBSITE WHERE YOU CAN BUY THE PRODUCT (WILL OPEN IN NEW WINDOW/TAB).

photo 3.JPG

DECORATING TIPS: This is the obvious one! Decorating tips add so much to your cupcakes and can really give them a professional look. They mostly do the work when it comes to decorating cupcakes☺ I believe that this is a must, and below, I have listed the tips that I like best. Click on the name of the tip, and you will be sent to a page where you can buy it!

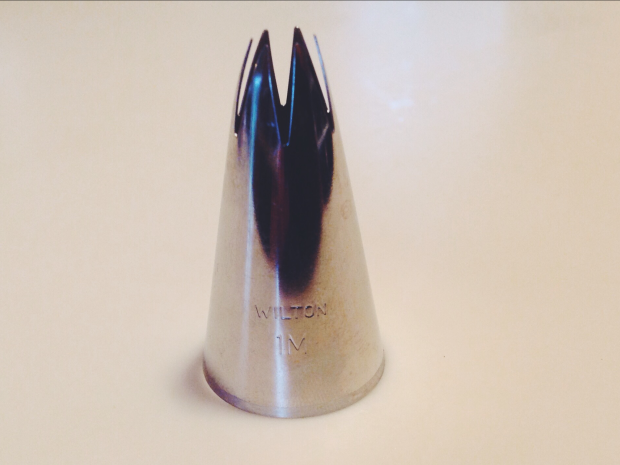
Wilton 1M: THIS IS MY FAVORITE!!!! It can make your cupackes perfect♥.  Using a buttercream or stiff whipped cream frosting works really nice!

photo 5


Wilton 4B: This gives your cupcakes a very unique look and it’s so fun! Once again, it works great with classic buttercream, and a nice stiff whipped cream frosting!

Processed with VSCOcam with f2 preset


Wilton 2D: This drop flower tip can be used to make a beautiful rose design or a nice pile of frosting on a cupcake! Also, you can decorate cakes with this tip. Just like the 4B and 1M tips, this requires a sturdy frosting that will keep its shape.

Processed with VSCOcam with f2 preset

Wilton 2A: This is an ideal tip for a frosting that did not come out as thick as expected or will not stiffen after piping. Cream cheese frosting, frostings with fresh fruit (like fresh strawberry buttercream), and just cupcakes you want to look simple are perfect for the 2A round tip!

Processed with VSCOcam with f2 preset


PIPING BAGS: If you want to use tips to decorate your cupcakes, you NEED piping bags. If you are a beginner, and do not want to buy these then large freezer bags (or another size depending on how much frosting you have) work great too. I have tried the reusable piping bags, but they are hard to clean and the oils from frosting stays behind on the bag. Also, once you cut a large whole on the bag, you cannot use small tips because they won’t fit! Disposable piping bags are perfect and you can simply throw them out when finished!! Or, clean them out to reuse them. Buy some here. If you only need a few, try asking your local grocery store bakery if you can have some piping bags.

photo 4


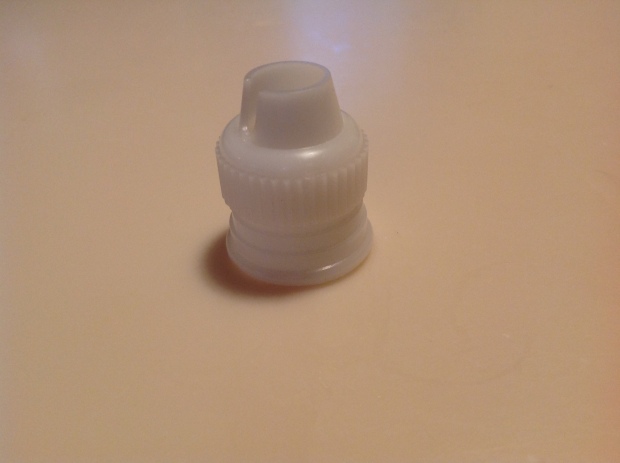
COUPLERS..?: Couplers. I never used these at first- I didn’t know what they  even were! When it comes to large tips like the ones listed above, couplers are not always needed. However, if you cut a whole too big, or just want to make sure the frosting does not squeeze out of the wrong spot in you bag then you need them. Small piping tips do need couplers or things can get messy!! For the Wilton cupcake tips that I linked above, you need a large coupler. For standard sized tips, you will need this coupler. Tutorial on how to use a coupler coming soon!

photo 2

The next step:

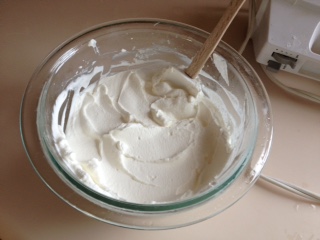
THE PERFECT FROSTING: Decorating cupcakes is NOT all about the tools. You also need the perfect frosting! Cream cheese, buttercream, whipped cream, and meringues (Swiss, French, and Italian) are all great pipe-able frostings. Below, I listed my favorite my favorite recipes for frostings that I have tried and used many times!! These are definitely not the only types of frostings there are. Caramel, strawberry, raspberry, coconut, ganache, fudge, cinnamon: this could go on forever…. Knowing basic recipes allows you to add whatever you desire to you frosting AND create whatever you desire. This link shows you so many ways you can flavor buttercream!!

Vanilla Buttercream Recipe (scroll down!)

Milk Chocolate Buttercream Recipe (scroll down!)

Cream Cheese Frosting Recipe (scroll down- LOVE this recipe!!!)

Whipped Cream Frosting Recipe- I have my own recipe for this, but it is very interchangeable. It is a step by step tutorial on how to make it w/ pictures!! The link goes to my first blog post- on how to make this frosting:)

Swiss Meringue Buttercream Recipe– I have never made any meringue frostings! This recipe and the other two meringue recipes are recipes I found that looked like they were stiff and could hold up well. Check them out!

French Buttercream

Italian Meringue Buttercream– includes a video!

cream.JPG


The last step:

TECHNIQUE: There are many different ways to frost cupcakes using these tips. Here, I show you the way I like to decorate my cupcakes. This post does not have pictures on how to make the decorations, but I will be making a post on that soon! I linked my favorite video tutorials below using these tips.

For the Wilton 1M, 2A and 4B: start on the outside, and work your way in, swirling around one swirl on top of another. This video shows you how to do it with the 1M, but it is the same for the 2A and 4B!

For the 2D: You can use the technique used for the other three tips, however, you can also do a rose design on a cupcake going backwards. Start on the inside and swirl your way outwards- not doing layers of frosting one on top of another. This is the video!!


Hope this video helped you decorate cupcakes! Feel free to leave a comment below on what you think of this blog:)


Homemade Whipped Cream Frosting!

Whipped cream frosting. Bakery frosting can often be very sweet and ruin the cake. Many people like whipped cream frosting better since it is lighter, not too sweet, and delicious!! Also, this does not have to be a “frosting”! It is really just whipped cream. Top a pie with this or dip your strawberries in it for dessert a healthy snack;)  The possibilities are endless!!The full ingredients and directions are listed at the bottom of this post. Let’s begin!!

The first thing you will need to do is gather your mixing bowl, heavy whipping cream and hand whisk/mixer attachment (depends on if you’re using a mixer or a whisk) . If using a stand mixer, you will need to use the whisk attachment. Hand blenders (whisk attachment) and hand mixers will work just as well for this. Hand whisks work too- but get ready to mix… A LOT!

The mixing bowl, heavy whipping cream, and whisk attachment/hand whisk must go in the fridge so they can chill for at least 30 minutes. The cream should be in there for a minimum of 2-3 hours. DO NOT TAKE THEM OUT UNTIL YOU ARE COMPLETELY READY TO MAKE THE FROSTING!!!!

Once your mixer is ready to go, pour your chilled heavy cream into your chilled bowl.

heavy cream

Once you done that, add in your powdered or granulated sugar and vanilla extract. You have to determine the sweetness, and based on that, add in the sugar.

sugar to cream

Next, whip it until stiff peaks form about 2-3 minutes. IT COULD TAKE LESS OR MORE TIME- YOU HAVE TO WATCH IT. When you lift it up with the whisk, it should stay up without falling. Below, is how stiff peaks and soft peaks look. Stiff peaks make it pipe-able and thick enough that it will keep its shape.

soft peaks

whipped cream

STIFF PEAKS


That is all! This is how my finished whipped cream looked like:


cream

I put my whipped cream frosting into piping bag and piped it onto a yummy key lime pie for the summertime!!


Homemade Whipped Cream Frosting Recipe

https://justlivenlovenlaugh.wordpress.com/

Ingredients:

1 cup heavy whipping cream

1-2 tablespoons powdered/granulated sugar

1 1/2 teaspoons vanilla extract


Directions:

  1. Leave heavy cream in fridge for at least 2-3 hours. Leave mixing bowl and hand whisk/whisk attachment in fridge for at least 30 minutes.
  2. Pour heavy cream into chilled bowl.
  3. Add in sugar of choice (amount depends on how sweet you want it. I like it with 2 tablespoons- even with that much it is not too sweet and not too mild) and vanilla extract.
  4. Whip until stiff peaks form (about 2-3 minutes. DO NOT only go by this time. It could take less or more time and you must watch it to make sure it does not turn into butter!)


Hope this post helped!! Feel free to leave a comment with any questions or what you think of my blog!!

Intro

Welcome to my blog! Here I will post DIYs and crafts, baking and healthy cooking, hairstyles, fashion styles, lifestyle and more!! Please leave a comment on any post suggestions and what you think of my blog. Thank you for stopping by:)